
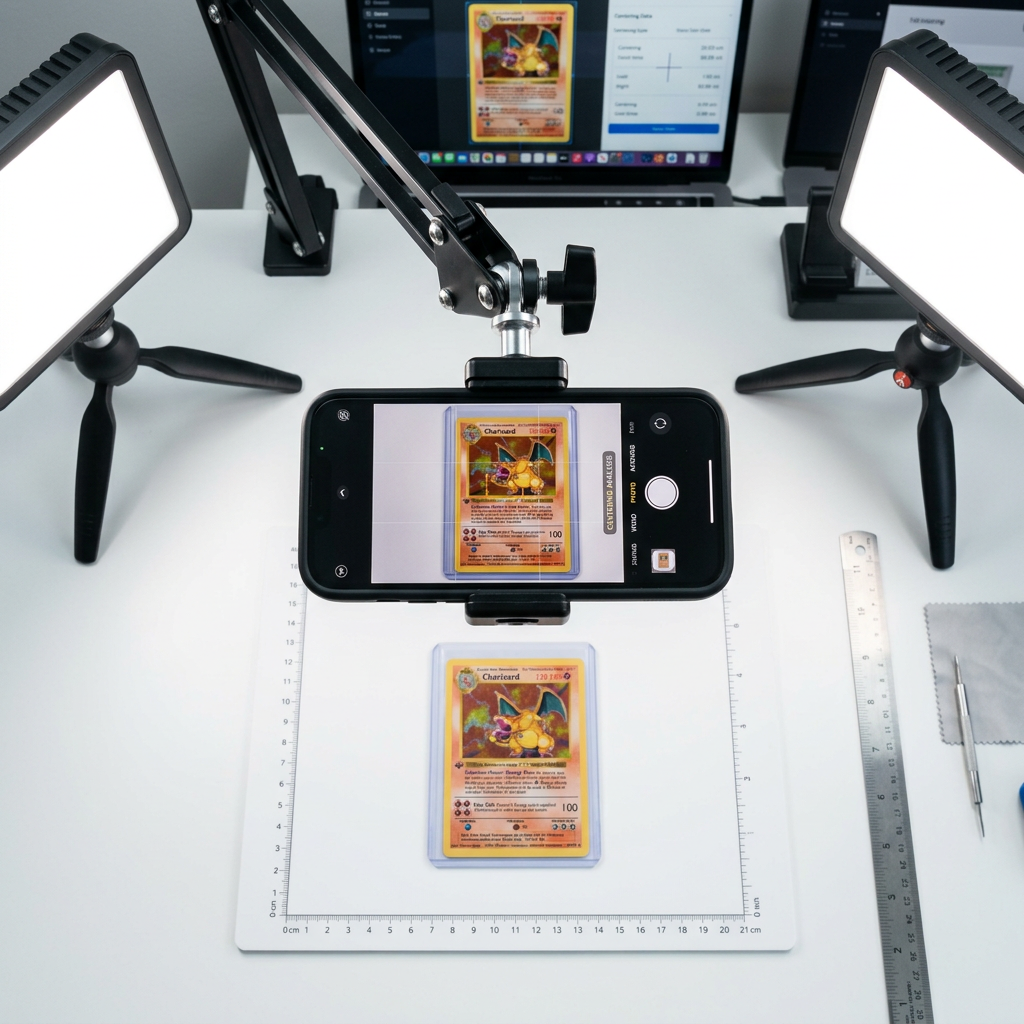
Updated May 2026. The single biggest reason an AI card centering tool returns a bad result is not the algorithm — it is the photo. A card photographed at a 5-degree angle through a sleeve under a single warm desk lamp can swing a centering measurement from 53/47 to 60/40, completely changing the grade estimate.
The good news: taking a usable card centering photo takes 30 seconds once you know the setup. This guide walks through exactly how to photograph a card for centering analysis — the angle, the lighting, the surface, and the small mistakes that quietly ruin results.
How do you take a good card centering photo?
Lay the card flat on a plain, matte, non-reflective surface. Hold your phone directly overhead — perfectly parallel to the card. Use bright, even, diffused light (natural daylight near a window is ideal). Remove sleeves and toploaders. Frame the entire card with a small margin of background, and ensure the image is sharp before you tap the shutter. That setup produces accurate centering analysis on virtually any modern smartphone.
Why photo quality decides your centering result
AI card centering tools work by detecting the outer card edge and the inner art border, then measuring the four border widths. If the photo is tilted, the borders appear unequal even when the card is perfectly centered. If lighting is uneven, the AI may misread shadow as border. If a sleeve creates a plastic edge reflection, the detection picks up the wrong line entirely.
The principle is simple: garbage in, garbage out. The same card photographed twice — once badly, once correctly — can return wildly different centering ratios even though the card itself never changed. That's why getting the photo right matters more than which AI tool you use.
The perfect card centering photo setup
Five things you need every time:
- Flat, matte surface — non-reflective, contrasting in colour with the card
- Bright, diffused light — ideally natural daylight from a window, not a single point source
- Phone parallel to the card — directly overhead, not angled
- Full card visible — entire card plus a small margin of background, all four corners in frame
- No sleeve or toploader — raw card if safe, or a matte sleeve only
Master those five and your centering analysis becomes consistent and repeatable across every card in your submission stack.
Step 1: Use a flat, plain, matte surface
The surface under your card matters more than most collectors realise. The AI uses edge contrast to find the outer card edge — so the background needs to be clearly different from the card.
- Avoid: Glossy wood, glass tabletops, dark mirrors, patterned mats, anything reflective
- Use: Plain white printer paper for dark-bordered cards (Topps Chrome, Panini Prizm)
- Use: A dark matte mat or grey card for light-bordered cards (Pokémon Base Set, Bowman)
- Use: Any neutral matte craft paper or photography backdrop
Contrast is key. A light card on a light surface confuses edge detection. A dark card on a dark surface does the same. Pick a background that visually separates the card from everything around it.
Step 2: Hold the phone directly overhead
This is the single most important step in the entire setup. Your phone must be perfectly parallel to the card — directly overhead, not tilted in any direction.
Even a small tilt of 3–5 degrees distorts the borders enough to swing a 53/47 reading to 58/42. The card itself hasn't changed; the perspective has. Most modern smartphones (iPhone 12+, recent Samsung Galaxy and Pixel) have a built-in level indicator in the camera app — use it.
If you do a lot of pre-grading, a simple overhead phone tripod ($15–$30) eliminates this variable completely and lets you photograph dozens of cards in a single session with consistent results.
Step 3: Frame the full card with margin
The entire card — all four corners, all four edges — must be visible in the frame, with a small margin of background around it.
- Too tight: Clipped corners ruin edge detection. The AI cannot measure a border it cannot see
- Too far away: The card becomes tiny in frame, reducing resolution per millimeter of border
- Just right: The card fills 70–85% of the frame with even background space on all four sides
Think of it like framing a portrait — give the subject some breathing room without making it the entire frame.
Step 4: Get the lighting right
Bright, even, diffused light is the goal. Natural daylight from a window works best for most collectors. Single-source artificial light (a desk lamp, an overhead bulb, a phone flash) creates a shadow along one edge of the card — which the AI may mistake for a border.
- Best: Soft natural daylight near a window, indirect (not direct sunlight)
- Good: Overhead diffused LED lighting, multiple sources, no harsh shadows
- Avoid: Direct sunlight (creates hard shadows and surface glare)
- Avoid: Phone flash (creates a centred hotspot and washes out details)
- Avoid: A single side lamp (shadows one side of the card)
The test: look at the card on your screen before you tap the shutter. If one edge is darker than the opposite edge, the lighting needs to be evened out before the photo is worth taking.
Step 5: Remove sleeves and toploaders when possible
Sleeves and toploaders introduce four serious problems for centering analysis:
- Plastic edge reflections — the sleeve edge looks like a second card border
- Refraction — the image shifts slightly through the plastic
- Glare hotspots — even small reflections wash out portions of the border
- False borders — the AI may snap to the sleeve edge instead of the card edge
If safety allows, photograph the card raw on a clean surface. If not, use a matte sleeve only — never a glossy penny sleeve or a hard toploader. After photographing, the card goes straight back into its proper protection.
Step 6: Keep the image sharp
Blurry borders are unreadable borders. Most modern smartphone cameras autofocus well, but a couple of habits help:
- Tap the screen on the card before taking the shot to lock focus
- Hold the phone with both hands or use a tripod to eliminate shake
- Wait for the autofocus indicator to confirm before tapping the shutter
- Clean your phone lens — fingerprints are the silent killer of sharp photos
Even slight blur reduces edge-detection confidence and can swing centering results by several percentage points.
Common card centering photo mistakes
These are the mistakes that quietly produce false centering readings:
- Photo at an angle — borders appear uneven even when the card is centered
- Sleeve glare — plastic reflections create false borders for the AI to detect
- One-sided shadow — heavy shadow along one edge mimics a thicker border
- Busy background — patterns or text near the card confuse edge detection
- Tight crop — clipping any corner makes that border unmeasurable
- Blurry focus — reduces border-detection confidence
- Wrong contrast — light card on light surface, dark card on dark surface
- Direct flash — washes out the centre and creates a hotspot artefact
Fix the input and the output gets dramatically more accurate. The same setup that works for a Pokémon Charizard works for a Topps Chrome rookie, a Panini Prizm parallel, or a vintage Bowman card.
Why this matters before grading
If you are using centering analysis to decide whether a card is worth submitting to PSA, BGS, CGC, SGC, ACE, or TAG, you want the cleanest possible measurement. A bad photo can falsely tank a real PSA 10 candidate — or worse, falsely promote a 60/40 card into looking like a 53/47.
Get the photo right and the AI card centering tool returns the same number every time you photograph that card. That repeatability is what makes pre-grading reliable.
For the full pre-grading framework, see our guide on how to check card centering.
How CardCenter handles imperfect photos
CardCenter's AI is built to tolerate small photo imperfections — slight angle variance, mild lighting unevenness, even some sleeve glare. But it cannot fix a fundamentally broken photo. If the card is at a 20-degree angle, no AI can recover the true border ratio because the geometric distortion is already baked into the pixels.
The better the input photo, the more confident the centering result. Pokémon collectors can run their cards through the dedicated Pokémon card centering tool, while sports collectors should use the sports card centering tool for chrome and refractor surfaces that benefit from specialised glare handling.
Frequently asked questions
Out of the sleeve whenever possible. Sleeves and toploaders create reflections, plastic edge lines, and refraction that confuse centering detection. If you must keep the card sleeved for safety, use a matte sleeve and avoid direct overhead light.
Bright, even, diffused light from above. Natural daylight near a window works well. Avoid direct sunlight, flash, or single-source lamps that cast a shadow along one edge — uneven lighting is one of the top causes of false centering reads.
Yes. Any modern smartphone camera takes photos sharp enough for accurate centering analysis. The phone's hardware matters far less than the angle, lighting, and whether you shoot directly overhead.
Usually because the photo is being taken at a slightly different angle, with different lighting, or with shadows along one edge. Recapture the photo perfectly overhead on a plain matte surface with even lighting and the result should stabilise.
No special background needed — just a plain, matte, contrasting surface. White paper works for dark-bordered cards, a dark mat works for light-bordered cards. Avoid patterns, glossy tabletops, and anything reflective.
Final thoughts: the perfect card centering photo in 30 seconds
A reliable centering analysis starts with a reliable photo. Flat matte surface, phone parallel and directly overhead, diffused daylight, raw card without sleeves, full card visible with margin, sharp focus.
That 30-second setup is the difference between AI centering results you can actually trust and results that swing wildly from one photo to the next. Master the setup once and every card in your submission stack gets the same fair, repeatable measurement.
Ready to photograph and analyse your next card? Try the free AI card centering tool and see your real centering ratio in under 10 seconds.